
Leather is a beautiful, natural, and sustainable material. It is the process called “tanning” that transforms an animal’s skin into a soft material that can be worked with and that lasts in time.
However, the way leather is tanned can give all sorts of results. It can range from something as rigid as cardboard or wood to something as soft and supple as fabric.
If you are about to make your own moccasins, you might be wondering what kind of leather to choose and how to choose good quality leather? I will cover these questions in this article.
Three Important Aspects For Our Patterns: the Softness, Thickness and the Flexibility
First, the most important aspect is the suppleness or the flexibility:
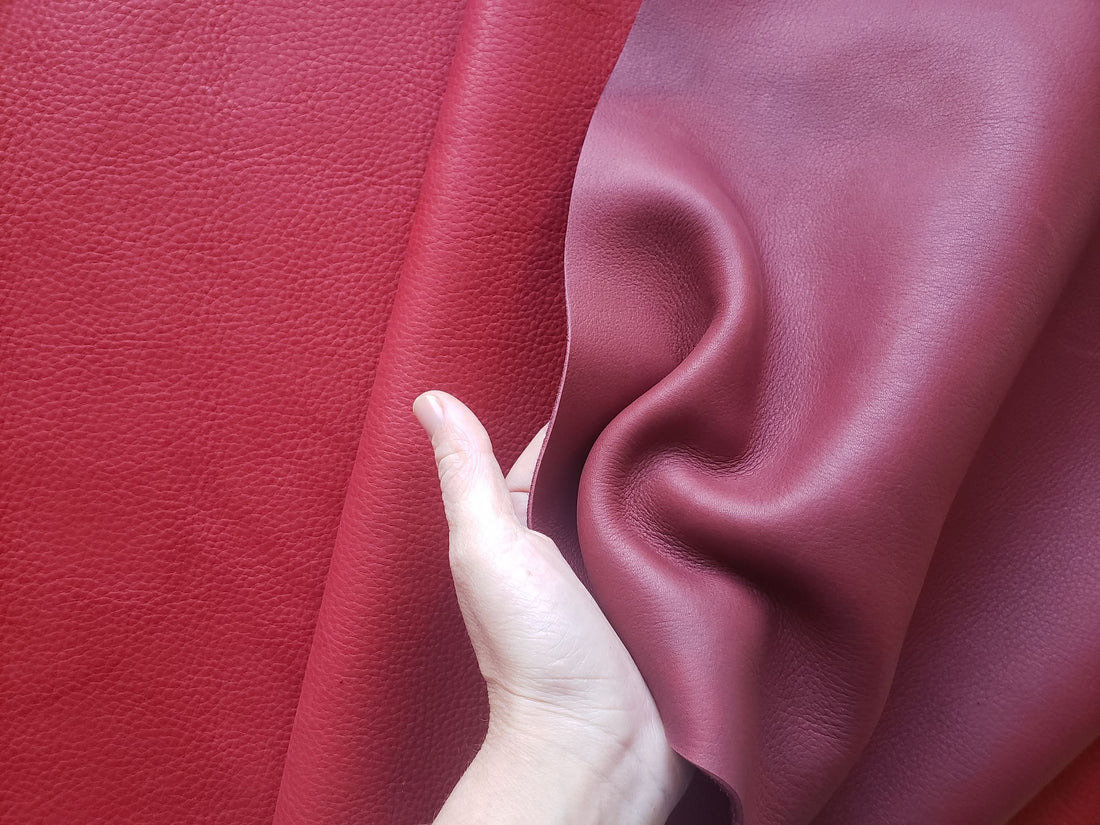
It is important that the leather is soft enough. The reason is that when stitching, it will make little folds around the toe-box to shape the moccasins. The more rigid the leather will be, the harder it will be to work with. So forget dry and semi-rigid leather or, even worse, rigid leather. Moreover, the softer the leather, the more comfortable your moccasins will be.
Of course, the thickness is important as well for durability; if you are going to wear your moccasins outside, especially. In general, the thickness can range from 1.2 to 2.2 mm. The ideal for sandals and the top of wrap-up boots is 1.4 to 1.8 mm and for moccasins in general 1.8 mm to 2.4 mm… If you are in the US, it would translate into 4 to 6oz – ideally around 5oz.
The difficult part is to find leather that is thick and flexible at the same time.
If you find it, “great!” but what if it’s not the case?
When it comes to choosing leather and if you are hesitating between different leather types, I would always advise the most flexible and soft one over the thickness. The reason for that is that you will most likely add a leather or rubber sole to the moccasins anyway.
Vegetable-Tanned or Mineral-Tanned?
There are two main categories of leather types: vegetable-tanned and mineral-tanned (usually chrome-tanned)
Without going into details about the tanning process and the health and environmental aspects of these two kinds of leather (which I will cover in another article), what you need to keep in mind is that vegetable-tanned leather is always more rigid. That’s why I usually don’t work with vegetable-tanned leather.
Once we know this, within the field of mineral-tanned leather, there are still many kinds of leather to pick from.
My Main Advice:
Beyond what it is technically called, my main advice is to choose the leather by touch. It is best to have an affinity with the material you’ll be working with. Personally, I love leather, primarily because it’s a natural material. I love its suppleness, its softness, its warmth, and its noble and authentic character, including its wrinkles and variations of texture and grain.
Unfortunately, the way leather is tanned these days can make it completely different: plasticized, cold, dry, and fragile… That’s why I advise you not to order leather online.
In the case you cannot go directly to a tannery, a leather wholesaler, or a leather shop, most of them will gladly help you find the right kind of leather for your project over the phone and send free samples.
Zero Budget and Low Budget:
If you have a low budget, might be able to start with recycling leather-like cutting into a second-hand leather sofa or another kind of leather items that you could find around. You could also train on thick felt or fleece material, although it doesn’t have quite the same elasticity as leather.
Leather off-cuts are also to consider. It is not that rare to find big enough pieces to make a pair. If you are wondering how big the leather piece should be, simply print the pattern or count that you will need the size of: “the width of your foot (+a bit of margin)” x “the length of your foot (+7 to 10 cm)” x 2 because you have 2 feet!
Suede Leather, a Safe Choice for Beginners
Suede leather is a little less sturdy than full-grain leather because it is made from the under layer of the skin when the skin is split in its thickness. Nevertheless, it is usually a safe choice for beginners because it is quite soft, therefore, easy to work with. It is quite easy to find in a wide range of colors and in thickness around 1.4/1.6 mm – 4oz.
If you choose this, it will be important to add a sole to your moccasins fairly quickly, and preferably with thicker leather (which doesn’t have to be quite as flexible) or some thin rubber. See the tutorial bonus for “How to make soles”.
Full-Grain Leather, Good Quality, but Not Always, Beware!
If you want better quality leather, you would have to look into full-grain aniline (or semi-aniline) leather.
Full-grain means that the surface level of the skin is intact, as opposed to nubuck leather where the surface has been sanded for a velvet touch. The structure of the skin is untouched, it is more sturdy, but be careful! It is not uncommon that an acrylic layer is painted on it to correct the imperfections like little scars, scratches, and spots on the skin. This painted layer gives an opaque and plastic-looking finish to the leather and would easily rub off, especially on the toes after time. It also makes the leather less breathable. Two things that are really not recommendable for shoes!
This is why it is important when choosing full-grain leather to look for “aniline” leather, which means that the surface treatment is transparent and that the leather was dyed in the mass. It is the most natural treatment that skin can receive but not many skins are selected “worthy” of this treatment, that’s why it is usually (more) expensive leather.
If You Already Have Leather at Home, Is It Suitable for Moccasin Making?
You might already have some leather at home, and you might wonder if it is suitable to use with our patterns.
As I explained at first, it is really important that the leather you work with is soft enough for the kind of design/patterns that I teach.
If your leather is too rigid, you could still use it for making the “Sun Sandals” by adapting the pattern with cut petals at the front instead of puckered-toes.
If your leather is too thin, you could still use it for the Sun Sandals, reinforcing the petals that hold the laces by gluing a double layer and adding a sole. Alternatively, you could use it for the top of the wrap-up boots by doubling (and gluing) the front/top part. All this is explained in the video tutorials.
Is Leather Suitable to Make Soles For Moccasins?
Yes, and we usually use leather off-cuts of the same quality as the moccasins to make leather soles. We have found that too rigid leather for soles results in slippery shoes and loses the quality of barefoot touch that we like. None less, if you are using suede leather or thin leather, it could be better to use a different kind of leather, preferably around 2 mm or more in thickness so that you don’t need to redo the soles too often.
In short, what you need to look for is soft but thick leather (if possible), and what you need to avoid is stiff leather. You can buy extra leather and rubber for soles in our Etsy Boutique.
Leather Stater Kits Are Available to Purchase
By experience, it is not that easy to find good quality leather. This is why we offer leather kits in our Etsy shop. We have selected a high-quality full-grain aniline bull leather tanned in France.
It is characterized by its softness, its deep and natural-looking color, its natural grain, and its warm and waxy finish. Moreover, it is easy to work with and very comfortable to wear. It has good resistance to water and is treated to be better stain resistant.
We do realize that ordering a kit can be a little pricey for most beginners, although it can be particularly interesting to get a good reference of what kind of leather to look for. If you can afford it, it will definitely save you from the struggle to source leather on your own, putting all chances on your side to have a good experience with making handmade leather moccasins.
We sell starter kits in our catalog to start with everything at hands, we provide the leather only, if you already have the tools, or in small kits or in half-bull skin (much more economical) in which you could make 6 to 9 pairs, same for suede leather.
Conclusion
Look for the softness first! The softer the leather is, the more comfortable your moccasins will be and the easier it will be to work with.
Avoid any kind of stiff leather!
Always get to touch the leather before buying it!
Now it’s yours for the making.
PS: If you want to learn more about leather in general which, is a big topic in itself, we advise you to read the website of Leather Naturally. Their organization is focused on education and promotion of leather material.
Click below to read their website:
Leather Naturally